The Mobile 12 Factors
Mobile applications and bring-your-own-device initiatives are playing an increasingly important role in Life Sciences. At Medidata, we’re extremely excited because mobile apps are a natural extension of our cloud platform, enhancing the patient experience and greatly improving the quantity and quality of health data available.
In the process of gaining familiarity with the unique characteristics of mobile application development, we’ve developed a set of best practices, inspired by 12factor.net. Following this methodology will produce mobile apps that:
- Are built, tested, and deployed with “1-click”
- Will provide telemetry and crash analytics when operating “in the wild”
- Can be traced back to their original build configuration and environment
- Are easily obtainable for testing
- Are well prepared for app store distribution
The Twelve Mobile Factors are:
- Build Configuration
- 1-Click Artifacts
- Tagging
- Test Automation
- Device Testing
- Dependencies
- Device and OS support
- Permissions
- Telemetry
- Crash Reporting
- Beta Distribution
- Store Publishing
I. Build Configuration
Clearly separate pre-release and store submission configurations
It is often helpful to enable behaviors in pre-release builds that are not appropriate for the build submitted to the app store(s).
Some examples of these pre-release behaviors are:
- private UDID reporting for tester activity tracking
- verbose output to the device’s system log
- test distribution update notifications
- relaxed security policies e.g:
- accepting self-signed certificates
- default passwords
- plaintext communication for debugging
Pre-release behaviors should be clearly marked in the code, and guarded using #if directives (Obj-C/iOS) or properties retrieved via a BuildConfig-style class construct (Java/Android). Some changes to the application project settings or manifest may be handled automatically by the build tools.
These behavior guards should be enabled or disabled at build time, using an explicit Xcode build configuration containing the macro definitions, or a generated BuildConfig-style class using gradle.
II. 1-Click Artifacts
Provide a centralized, repeatable build and deploy service
It is vital to keep track of build artifacts and allow them to be generated and deployed with low friction. Having a centralized “1-click” build and deploy service enables the team to make builds available through a repeatable, traceable, and transparent process.
A mobile app should have the following “1-click” build jobs managed via a central service:
- Build and deploy a ‘test’ build to beta distribution portal (e.g. TestFlight, HockeyApp).
- Build and archive a ‘release’ signed build for app store distribution.
- Generate validation reports.
In order to set up such a system, the open-source Jenkins CI server is the de-facto standard. Support for multiple build environments can be accomplished using “slave nodes” may be associated with the master server to provide a variety of environments.
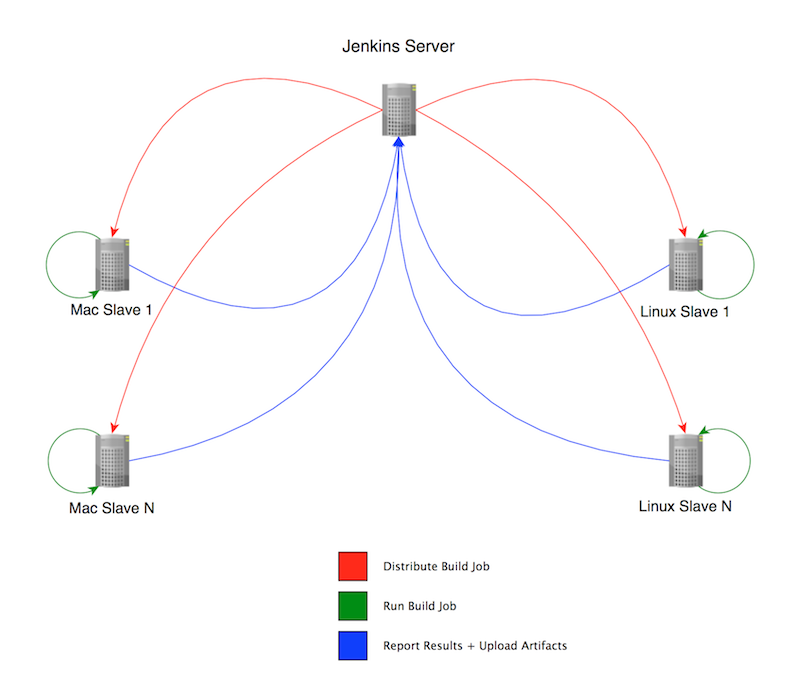
Slave nodes can be ‘tagged’ with different labels indicating their capabilities/environment (e.g. Xcode5, Mac, AndroidSDK-14 etc…), and build jobs can be tied to slaves nodes by these labels.
The central Jenkins server is then used to define the build jobs to be run on the given nodes, as well as recording the build results (incl. test coverage etc…) as well as archiving the build artifacts from a job. The Jenkins server then becomes the canonical record for all deployed artifacts, and as such it is essential to provide backup for the master’s storage device.
III. Tagging
Provide breadcrumbs to trace builds back to their configuration and VCS origin

In addition to producing 1-click artifacts, we must ensure that all artifacts can be traced back to their build configuration and origin in the source repository.
Generally there are two types of version tagging available for mobile apps, the Version Number (a.k.a Marketing Number) and the Build Number. The Version Number is what customers associate with your app, e.g. 1.0, 2.1.1, or more likely in our case ‘2014.1.1’.
The Build Number is a monotonically increasing value which may contain period-separated values on iOS, or a single integer value on Android. This number is used to identify the iteration of the app externally, and internally allows us to further trace the origin of the build.
Since a Build is comprised of the source at a particular revision (commit hash) and the environment that produced the artifacts (toolchain, compile-time settings, etc…), the Build Number of the app should be internally mappable back to the Build Job that created it (where the environment and further build settings can be found).
A simple mechanism for producing the build number is to relate it directly to the build number of the Jenkins Job that is tasked to build the ad-hoc or store-submission artifacts. If Jenkins Jobs are moved, recreated etc, you can simply take into account a “build number offset” (e.g. ‘101’ maps to build ‘1’ on the new Job) when using the build number of the the new Jenkins Job, or use more invasive techniques to sync up the new build numbers with the old.
IV. Test Automation
Automate all the things to aid development and testing
All projects should have, at the least, Unit-Tests that provide coverage for the individual components of the application as they are built and issues are addressed.
RSpec-style test frameworks are currently in fashion, such as Kiwi and Cedar for iOS, and Robospock for Android. These BDD-style frameworks provide a structure (and built-in stubbing/mocking) over the vanilla XCTest/JUnit tests provided by the platforms.
Functional/Feature/Integration tests are best handled with Cucumber scenarios and tools such as Appium that can drive mobile interactions using the platform vendor’s tools (UIAutomation on iOS and … UI Automator on Android).
Providing Functional tests in this manner allows us to define feature scenarios at a high level, tracing them back to their business requirements, and allowing SQA to be directly involved in the scenario definitions. Automated regression tests can be run on different OS versions and devices, helping to identify compatibility issues without manual intervention.
Additionally automated functional testing helps development by automating repetitive profiling tasks (e.g. watch memory usage while logging in and logging out repeatedly) and debugging tasks (attach debugger while automated scenario runs).
Integrating test runs into our Continuous Integration environment allows us to monitor the health of our code base.
V. Device Testing
Test on actual hardware whenever possible
During development it is important to test changes quickly, and that usually involves pushing the development build to the iOS Simulator, or the Android Virtual Device emulator.
While generally not as convenient, testing on actual devices will expose issues that will not manifest themselves otherwise due to:
- processor and memory characteristics
- cellular/wifi data network conditions
- input methods
There are many capabilities that mobile devices offer that their simulated/emulated counterparts do not, such as:
- bluetooth/accelerometer/microphone/camera hardware
- push notification registration and reception
- telephony (incoming call) interruption
- audio route changes (e.g. headphones plugged/unplugged)
- network reachability (e.g. wifi/cell data) changes
Because of the disparity present between desktop and device-testing, it is essential that testing is regularly performed on supported devices. Over time a large collection of physical devices can grow and be pruned, but the top 10 android and iOS devices are a good place to start.
Manual testing should almost always take place using a physical device if possible, and during smoketesting it is important to stress connectivity issues by wandering out of wifi and cell range, switching networks, etc…
VI. Dependencies
Stay current with 3rd party SDKs and platform toolchains, plan for regular updates.
Mobile app dependencies include tools and SDKs from the platform vendor (e.g. Xcode+iOS SDK, Android Studio/ADT+Android SDK) as well as 3rd-party modules. The standard package managers are Cocoapods for iOS and Gradle/Maven for Android. It’s important to keep these dependencies as up-to-date as possible in order to take advantage of bug fixes and stability improvements.
Especially important is to plan for yearly updates to migrate to new toolchains (e.g. Xcode 6) and OS SDKs (e.g. iOS 8).
Typically for iOS, a new iOS SDK is announced and released as beta, along with Xcode, at the beginning of June @ WWDC. The beta period typically runs for 3 months, with a GM build released in the fall along with new hardware.
During these beta periods it is important to run through the following checklist:
- Does the current production build of the app (available in the store) behave as expected running under the new OS?
- Does the current development build, using the previous iOS SDK, behave as expected running under the new OS?
- Does the current development source build and link cleanly with the new OS SDK?
- Does the current development build, using the new iOS SDK, behave as expected running under the new OS?
The beta period is a valuable time to take early action when issues are encountered, describing issues on the private developer forums and filing apple radar reports to address outstanding issues affecting our applications.
VII. Device and OS support
Be explicit about device and OS support levels
When building a mobile app there are many decisions to take into account – significant among these is the level of device and OS support that will be offered. It is also ideal to build your views using relative layouts and constraints from the outset (rather than hardcoding positions), especially for Android apps.
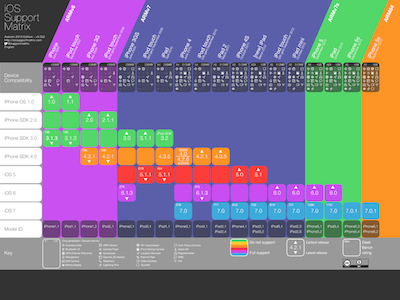
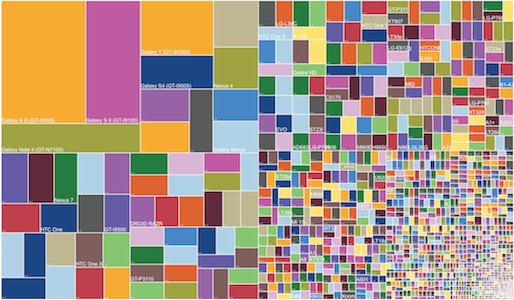
The number of device models and OS varies for iOS and Android, with Android obviously leading fragmentation.
When discussing device and OS level support for your app, take into account: * customer requirements * desired application capabilities (e.g. video capture support, bluetooth functionality) * (anticipated) popularity of the device/OS version * tablet layout requirements
The last point, tablet layout requirements vary greatly between iOS and Android.
Whereas iOS offers only 2 aspect ratios (3:2 & 16:9) with retina and normal resolutions, Android presents a continuum of aspect ratios and resolutions:

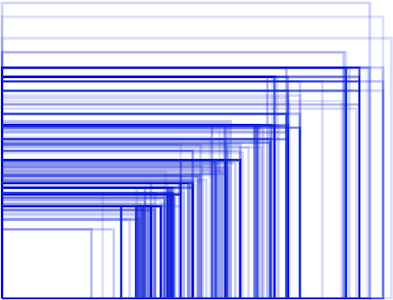
Because of the vast array of Android offerings a project should decide at what point an android device gets the ‘tablet’ vs ‘phone’ layout for an app. Generally a good cutoff is the 7" screen or 600dp (dp: density-independent-pixel) – e.g. any device whose smallest width of the available screen-space is greater than 600dp renders a ‘tablet’ layout, and others receive a ‘phone’ layout.
Device and OS level support need to be explicitly stated in the project configurations:
* The iOS deployment target is set to the minimum supported OS level
* The iOS required capabilities keys are explicitly stated
* The iOS device target accurately reflects tablet or phone support
* The Android project manifest has its <uses-sdk> attributes properly set
* The Android project manifest has its <uses-feature> attributes properly set
* The Android project manifest has its <supports-screens> attributes properly set
VIII. Permissions
Carefully consider the device permissions necessary
All mobile platforms provide a mechanism to declare what permissions are required for your application, and it is important that only the minimum permissions necessary are declared.
It is especially important if using certain permissions for testing (e.g. access to external storage devices on Android) to ensure that these permission requests do not make it into “store submission” builds (see the Build Configuration factor for additional information).
In addition to spurious permissions, only the necessary ‘device capabilities’ should be declared in order to properly reflect the device compatibility level, and the intentions of the application.
As discussed in Device and OS Support and Build Configuration, the following should be audited when considering necessary permissions and capabilities:
- The iOS required capabilities.
- The Android project manifest
<uses-feature>attributes. - The behavior enabled via Build Configuration
IX. Telemetry
Inform product decisions by collecting usage metrics and analytics
Gathering information from apps running in the field is extremely helpful in understanding user behavior and uncovering issues, helping prioritize our backlogs.
Information that can typically be gathered:
- Device Model/OS version
- Time Zone/Locale
- Battery Level
- Wi-Fi/Cellular Connection State/Carrier Name
- HTTP Latency/Errors
- Session Length (e.g. how the user keeps the app open)
- Interaction Details (e.g clicked x button instead of y button)
There are many 3rd party services that can be leveraged to report telemetry: BugSense, Crittercism, HockeyApp, Apphance, TestFlight, New Relic, HP, Compuware, and Localytics.
We are currently investigating NewRelic’s mobile integration since we are heavy users of their server-side monitoring, but are still in the early days of evaluating it.
That being said, evaluating what, where, and how data is sent using these services is equally important. We take great care to anonymize all automated reporting and encrypt all communication. While many of these services offer convenience by gathering certain metrics by default, there is a definite advantage in custom logging for app-specific interactions and scenarios.
X. Crash Reporting
Be notified of error reports in the wild, triage them regularly
One of the worst app behaviors is a crash, where a fatal condition is encountered and the user is unceremoniously dumped back to the home screen with no indication of what happened.
When crashes occur, especially in production apps, we want to be notified as soon as possible and get in front of the issue causing the crash.
Unlike server-side applications, native apps are stripped of debugging symbols before distribution. When a stack trace is collected on the device, its human-readable information is not present, and must be transformed via a process called symbolication.
Like telemetry, there are a number of 3rd party services that will collect, symbolicate, and collate crash reports. Due to our requirements of security and anonymity for automated reporting, we chose the HockeyApp service for our crash reporting as it is built on open-source tools (HockeySDK and QuincyKit), making the collection and transmission of stack traces fully transparent to our engineers.
XI. Beta Distribution
Use established 3rd party distribution portals
When providing smoke-test builds to testers and release candidates to a larger audience, it is extremely effective to use a distribution portal rather than manually deploying builds. Using a portal allows us to track the versions in use, the devices that they’ve been installed on, and the users who are interacting with it.
By tracking this information, we can better internally support users and troubleshoot the issues we’re seeing during smoke-testing. Additionally we can restrict access to pre-production builds, requiring known devices and users.
Building and deploying builds to these portals should be a 1-click process.
There are many commercial services in this space, as well as services offered directly by the platform vendors that are becoming more mature. These portals often provide crash reporting services that can be leveraged as well - we use HockeyApp as our distribution portal which serves both roles.
XII. Store Publishing
Be aware of the various store requirements and idiosyncrasies, account for and leverage review times
The main stores, Apple App Store, Google Play and Amazon Appstore all have different requirements and review processes.
The Apple App Store currently has the most thorough and time-consuming review process. In practice, anticipate 1-2 weeks of review time after submission to Apple.
Because of the extended review time, it is often advantageous to submit a release candidate (a 1-click artifact) to the Apple App Store while final testing continues. In this way, we can hedge our bets if final testing uncovers no show-stopping issues that would require another build.
If issues are discovered during final testing, the binary waiting in review can be rejected at no cost, and a new release candidate uploaded. This will reset our position in the App Store review queue, but has no other consequences.
In contrast, the Google Play Store has no review process aside from automated checks. The Amazon Appstore has a minimal review process, in practice 1-2 days.
Preparing the submission requirements of each store well ahead of time, and anticipating the differences in review times should allow us to make informed decisions about platform release schedules, requirements and risks.
These 12 factors are the results of applying our own lessons learned, and as we continue to expand our platform we will hopefully add to and expand these guidelines. Any feedback is welcome - we’d love to hear about your own best practices for building and distributing mobile applications into the wild.